
Instead, make sure it slopes away from the wall for proper moisture management. Cut 45-degree miters in the side J-channel. Fill out our form to start your free quote. Note in Figure 2 that the flashing at the bottom of the wall is just one of a number of wall details that work in concert with each other to ensure water drains down and away from the building(Straube 2007). Use a metal flashing material that is the proper size and shape to direct water over the front edge of the top of your window and door trim. Most Durable And Effective Wood Floor Paint Options! Lap the side over the bottom as shown. Maneuvering long pieces of vinyl into place can be tricky. Report summarizing current research, summarizes issues that have been experienced with current best practices, and recommends ways in which the best practices can be improved for water managing sheathings. Here are the steps to retro-flash a roof.
26 galvanized sheet gage), corrosion-resistant weep screed or plastic weep screed, with a minimum vertical attachment flange of 31/2 inches must be provided at or below the foundation plate line on exterior stud walls per ASTM C 926. With it installed, rainwater should flow down the flashing and towards and towards the shingles. Install the battens to cover the gaps. For exact code language, refer to the applicable code, which may require purchase from the publisher. Finally, make sure the water receivers are ten inches tall above the finished roof. Next, install the kickout flashing, and work your way up. As using flashing is related to these, the environment should be an important consideration. Roof flashing plays a significant role in house construction. Should There Be a Gap Between Wood Siding and Roof? Best practice with any wood or fiber-cement siding calls for building a rain screen assembly. Principles of a Water Managed Wall System. Trying to learn how to install roof flashing? We'll show you how to install it and make repairs. Avoid last-minute shopping trips by having all your materials ready ahead of time. This helps ensure water has no chance to seep behind and damage the sheathing. Web1. Follow safe work practices as described in the Standard Work Specifications. The Compliance tab contains both program and code information. Factors Affecting the Overall Cost. However, while these shortfalls will lead to water getting through the surface, the water can be managed. On the other hand, if you are familiar with roof flashing and want to give it a try fixing it, then heres a brief guide to help you. Since the process is very finicky. Most exterior wall cladding systems leak. Removing the old mobile home windows and replacing them with vinyl siding is a fairly easy process. Guide describing details that serve as a visual reference for each of the line items in the Water Management System Builder Checklist. Before getting ready to install flashing, youll need some basic knowledge of this. By using this Site, you accept and agree that following any information or recommendations provided therein and all channels of digital content is at your own risk. It covers the seam where those two building elements meet, Ojeda says. Install your underlayment under the shingles.
So, you need to install the appropriate flashing for these scenarios. There should be a gap of approximately 5/16 inches between the siding and 2 inches between the siding and the edges of the roof. Website providing the technical specifications and related documents for home builders, subcontractors, architects, and other housing professionals interested in certifying a home to the EPA's Indoor airPLUS program requirements. The width of the bottom flashing will vary. The same problem applies when placing a roof flashing against siding too. Remove a piece of siding and identify it. For roof flashing against the siding, it should beat least4 inches or 102mm wide. If you have to add new siding, position it in an obscure spot, like the base of a wall or behind the garage. Thus, the wetness can also be detrimental to the siding. Start above the window and visually check that all building papers and flashing lap over the piece below it so water cant run behind. Your flashing and shingles will bend over the roofs peak, creating a curved application and will keep that joint nice and water-tight. If you dont have access to this, you can simply use the wrapped corner method. As with new construction, the goal is to direct water that passes behind the cladding and reaches the houses water control layer downward and out, away from the building. These steps should ensure you get perfectly overlapped shingles and flashing from the bottom of your roof to the top peak. Youll need specialty tools, like this zip tool, to work with installing vinyl siding. Building paper is an important part of the walls waterproofing. To then restore the siding over the flange, you can apply fresh stucco or a separate piece of trim (e.g. How you install roof flashing will vary depending on which type of flashing is being used; however, many of the basics are the same, so well go over a basic step-by-step on installing step and kickout flashing. As concrete has this nature of absorbing and draining liquid through its pores. Installers sometimes go back and caulk the 3/8-inch gap between the flashing and the siding, which defeats its purpose. ), How to Construct a Drainable Wall Assembly with Wood or Fiber-Cement Sided Walls, How to Construct a Drainable Wall Assembly with Stucco Clad Walls. To hide the gap, you can paint it with matching aluminum flashings to give it a clean look. It must be placed a minimum of 4 inches above the earth or 2 inches above paved areas and must allow trapped water to drain to the exterior. The brick must be installed with a 1-inch air space behind it to allow water that seeps into the brick to freely drain. Its actually a pretty bad idea. Finally, you will need to install the new windows. You must have JavaScript enabled to use this form. New vinyl siding is quite flexible, especially in warm weather, but older siding becomes more brittle with age, so work carefully. This method wouldnt work if you had to splice in new vinyl, because the colors wouldnt match. (Source:Building Science Corporation.). Place each step piece so that it overlaps the shingles below and below the shingles above in an interweaving style. Aluminum trim pieces require aluminum or stainless steel fasteners. Another form of flashing under siding is Z-flashing.
Secondly, you should consider using removable counter flashings. The key is to create a good drainage plane behind the stucco that drains to a weep system, allowing the water to flow out and away from the building. The following authors and organizations contributed to the content in this Guide. Cut the side J-channel 2 in. Type of plywood siding: T1-11 plywood siding is less expensive than other types due to its simple design. Document outlining a well-detailed drainage plane and flashings. Start with coil stock. So in the long run, serious hazards like corrosion or cracking can happen. Corner flashing is commonly used around walls or dormers that protrude from the top of the roof. (See code for additional requirements and exceptions.). And as always, its best to hire a professional team like Northface Construction to install flashing to make sure its done right the first time.
Drive nails so that the exposed shank equals the thickness of two layers of siding (1/16 in. (Choose The Correct One)Continue, Driving a screw through an MDF can be challenging because of the boards brittle nature. In that case, its best to cut your flashing. Cut and notch J-channel to fit over the top of the window. It is well known that the roof flashing is always installed against the wall, but in some cases, it may be necessary to place the flashing over the siding. The only special tool youll need for reworking areas is an unlocking tool, often called a zip tool. This field is for validation purposes and should be left unchanged. How To Install Horizontal Flashing James Hardie 13K subscribers Subscribe 14K views 5 years ago Better Building Practices - Wall Working around exterior windows can be tricky. It either helps guide water into your gutters, or if you dont have gutters, it will ensure water flows away from your homes soffit and fascia, keeping it safe from water damage.
Now you can start your project of putting flashing between siding and concrete. The size, however, may vary depending on the siding. Underlay or underlayment is usually placed under the carpet to provide comfort whenever we walk. For each type of roofing feature, there is a different type of roof flashing. Repair torn or damaged building wrap as needed. When you are installing lap siding, incorrectly installed flashing may lead to moisture issues that can affect other aspects of the home in addition to the siding. Nail it to the sidewall (or glue it if nailing isnt possible). But it is a rectangular piece of flashing, that as it descends down the roof, does end up looking like steps. Assess the condition of the sheathing. Because the siding is beveled, the cut edge under a window may end up about 1/2 in. Roof flashing is not a one-method solution. Flashing can be installed alongside engineered wood lap siding using, A hand seamer (a siding brake is optional), LP SmartSide siding installation instructions. The best way to retro flash a roof with wood siding is to flash the roof wall intersection by cutting out a groove in the siding. All rights reserved. Especially for siding and concrete. On wood framing, wire lath must be installed with the long dimension running perpendicular to the wall studs. The Building America Field Kit allows you to save items to your profile for review or use on-site. Right A rigid corrugated rain screen product is installed shingle-fashion with overlapping edges behind rock veneer. For more information on conditions that may be encountered when working with walls in existing homes, see the assessment guide on walls, windows, and doors. You may have to bow each length of vinyl to release its ends from the trim moldings, and you may have to slide short pieces up or down past the window to release them from the J-channel. All rights reserved. Make sure the top edge is on the layout line, then drive roofing nails at each stud. The goal is to create a wall system that can manage the water that will inevitably get behind any cladding system. What Are The Most Durable Hardwood Floors For Pets? 30: Why You Need a Home Inspection and What to Expect. Can You Tile Over Tile? Remove siding until you expose enough wall to replace the window. Thus, it wont get stuck behind the stucco. When you get to the top of the roof, cut a piece of step flashing in half. ENERGY STAR Single-Family New Homes Implementation Timeline. Install flashing under the bottom edge of the house wrap or other weather-resistant barrier shingle fashion to direct water out of the wall.
Make the miter cut on the bottom with shears. Then, fold the flashing five inches above the roof and extend the other 5 inches onto the wall. Nail the Flashing to the Wall. So here are the steps to install the flashing against the side wall. This way, you can insert the flashing in between. While many homeowners dont think much of roof flashing, its important because each and every component on your roof leaves it more susceptible to water exposure. Typically, these wall leaks are caused by missing flashings or poorly executed flashing details at the following: The key to eliminating costly leaks is more than just applying a piece of flashing. Through-wall flashing. Then cut off shrubs, bushes, and tree branches that may obstruct the construction area. When more than one length is needed to span across the bottom of a wall, overlap pieces at least 8 inches.
If you happen to be located near Elk River, Minnesota, make sure to contact our team at Northface Construction! Despite the importance of flashing, some roofers re-use flashing and other roof components. You need to create a functional wall assembly that: Drainable wall assemblies integrate a weather-resistive barrier and flashing to properly drain water away from building components. to secure it. Right A mat is installed to contain radiant floor loops which distribute hot water from this homes combi boiler. gap at all ends. Section R703.7.6 Weepholes. Wind pressure and capillary action can drive rainwater through the many cracks, joints, and small gaps in a building's exterior. Also, you need to follow the correct installation method for your flashing type. Don't be intimated by vinyl siding. Lets move on to what you should keep in mind while installing flashing. WebSiding Details At Roof-Wall Joint Step Flashings to Avoid Rot. Depending on the area, professional home builders may use any of the following: While it is not wrong to let seasoned DIY enthusiasts attempt to install the fixing, roof flashing installation and repair is a rigorous and time-consuming job that is best to leave with professionals. out from the wall. Video from Home Innovation Research Labs showing how to correctly install brick cladding on exterior walls with a drainage cavity behind it for moisture prevention. Removing the old mobile home windows and replacing them with vinyl siding is a fairly easy process. longer than the width of the window. In these instances, corner flashing must be laid down first, so you can build up your kick out or step flashing on top of it. Keep applying the shingles and flashing from that point until you get to the top of the roof. Retrofit existing exterior walls by adding base flashing to improve drainage, which mitigates water leaks and extends the life of the cladding. The air space is created by installing furring strips (vertical pieces of wood or plastic) spaced every 16-24 inches over the weather-resistive barrier. In fact, you may want to re-side an entire wall with new vinyl.
Both layers should overlap the top edge of the weep screed (, Lath. While many homeowners are tempted to give the DIY route a try, even basic flashing installation can be tricky to do correctly. Water that collects on the through-wall flashing must be able to drain out through weep holes, which are formed by an "open" head joint (as shown in the illustration above), or with rope inserted into the mortar joint (as shown in the photo below). Building America Solution Center is a resource of the U.S. Department of Energy's Building Technologies Office. A field guide with residential construction best practices. When theyre installed correctly, your LP SmartSide products will be backed by the prorated limited LP SmartSide warranty. This way, you can insert the flashing in between. However, the installation can be confusing for someone unfamiliar with flashing and siding. This prevents moisture from penetrating the wall where it meets the roof. The second layer works as a bond breaker. Its a barrier to any water that may work its way behind the siding, so be sure upper pieces lap over lower ones. In the end, your flashing should be covered halfway by shingles, and the other half will be covered by your siding. Code language is excerpted and summarized below. Heres a quick tip: If you are installing LP SmartSide 38 series lap siding, you can use a scrap piece of the siding to create the proper gap (38 series lap siding is approximately 3/8-inch thick). Then slide the tool horizontally along the lock to release it. Read More What Sizes Staples For 1/2 Underlayment? Right A rigid rain screen product completely covers the wall behind the cladding and window framing. This tends to be easiest with lap or panel siding cladding types that can be removed and re-installed by unscrewing fasteners, and most difficult with brick and stucco claddings that require materials to be chipped out and replaced. Position the J-channel under the window. The flashing must include a drip-edge to direct any water that runs down the drainage plane away from the bottom of the wall. In addition, there should be a gap between the siding and the shingles to prevent moisture from getting trapped. If you want to shift a window, replace a door or even put on an addition, you can remove, alter and reinstall vinyl siding much more easily than any other type of siding. But it mostly cracks over time. (2023), America Has Spoken: This Is The Best Hardware Store, Property Taxes Are Rising, but Data Shows They Arent Keeping Pace With Home Values, Youre (Probably) Recycling Wrong: Heres How To Do It Right, Ohio Train Derailment: Resources for Ohio Homeowners. Then we cut a long length of extra siding to complete the row. Hence, consider the weather before choosing your flashing. Slide 5-in. CLICK TO ENLARGE Make sure the sheathing wrap overlaps all step flashings. For the most part, skylights will come with their flashing much like a window might, but if not, roofers will install their own to ensure a tight seal. Installing roof flashings shouldnt be a problem if you understand and follow the correct procedure. While this can save some money, your flashing can be damaged during the roof replacement process and potentially lead to water damage in the future. When placing flashing against the siding, the technique that you will be most likely to use will be step flashing. The air space also allows air to flow freely behind the siding, which increases the wall's ability to dry. Next, you will need to cut the vinyl siding to fit the opening and nail it into place. Drive nails (which will need to be longer than the board nails) through the gaps; avoid driving through the boards. The larger space can create faster, unobstructed drainage. to 1/8 in. 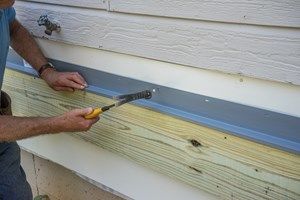 where the roof meets the vertical surface). Hold each piece of flashing in place on the side wall with a single nail. Mark it on each side of the window, allowing an extra 1/4-in. Youll probably need new vinyl siding trim pieces. Install the water-resistant barrier to overlap the top edge of the weep screed. wood), as long as the trim or stucco is lapped over the flange. Otherwise, it will likely cost you more than your allocated budget. Marking the position of each piece before you remove it (Photo 2) will help you reposition the siding without stretching it. However, if upon removal of the cladding, rotten sheathing is discovered, additional removal is recommended to remove and replace all rotten sheathing and mitigate the cause of the damage. If a batten is crooked, stretch a string alongside it and force it straight as you nail. In the sequence of construction, the flashing would need to be installed first. Cut a gap of approximately 6-1 / 4 in the siding, and then use a removable trim edging to cover the gap. Make sure the bottom of the flashing does not emerge at the bottom of the lap siding. It's a phrase that likely brings up a wide range of feelings for the average homeowner. To do that, you will need the following equipment: The first step is to cut a sheet of flashing. When you are installing lap siding, incorrectly installed flashing may lead to moisture issues that can affect other aspects of the home in addition to the siding. ; Local labor costs: Depending on the location, plywood siding installation costs range from $1.5 to $3.5. Lets move towards our next part. A minimum 0.019-inch (No. Drive roofing nails every 8 to 10 in. Helps prevent water vapor from the cladding from being driven into the wall assembly. If there is not enough space, the siding could split, warp and warp in many ways. Tape any tears or holes with housewrap tape (available at home centers). Rain-screen wall systems are considered best-practice upgrades in all exposure regions to ensure the long-term durability of building assemblies, but are especially recommended in High and Extreme exposure regions, as shown on the map below (BSC 2004). When youre done flashing the window, stand back and imagine water running down the wall. WebHeres how to install flashing under siding: Cut a piece of flashing a minimum of four inches (102 mm) wide.
The vinyl must be free to expand and contract. The one issue with continuous flashing is that it can bend and break as your house shifts as it expands and contracts in certain weather. Next, you should consider using counter flash for its ability to direct water from the wall to the roof.
Install new flashing and weather-resistant barrier (fluid applied membrane, building paper, or felt) as needed. Building Science Corporation, lead for the Building Science Consortium (BSC), a DOE Building America Research Team We recommend the best products through an independent review process, and advertisers do not influence our picks. So, pouring concrete against siding can cause it to fail. ENERGY STAR Single-Family New Homes, Version 3/3.1 (Rev. Theyre made of many elements like vinyl, wood, cement, or other composite materials. Install Battens. This is a good idea for keeping mud wasps from building their nests in the weep holes, and to prevent other obstructions from blocking the free flow of water (. It completes the dual flashing component where its necessary. Voila, your flashing will finally be stuck on your concrete. First, you will need to remove the old windows and measure the opening. Heres how to.
The gap gives the material enough room to expand and helps prevent damage. Dont slide the flat bar behind the siding itself. For wood siding, trim it into a minimum of inches (6.4mm). This helps to stop mortar droppings from clogging the weep holes (, Weep holes. Drainable wall assemblies are recommended in all exposure regions. The vinyl siding trim pieces arent as critical. You need to install it over and into the slab. For the retro-fitting you'll have to chisel out the stucco, enough to fit the flashing in and scoop it behind the wrap. Figure 1. (Everything You Should Know), Fire Tape Vs. Drywall Tape (All You Need To Know), Exterior Trim Nail Size! It channels water downward to the kick-out flashing, which is intended to help manage water coming off step flashing. Measure and notch the top piece over the window. Type of plywood siding: T1-11 plywood siding is less expensive than other types due to its simple design. ; Local labor costs: Depending on the location, plywood siding installation costs range from $1.5 to $3.5. wide vinyl siding flashing under the windows nailing fin. With this approach, any water that leaks through the cladding will run into a water-resistant surface and safely drain down and out of the wall. Ensure that weep holes are included in the bottom course of brick to allow water to drip out and down the flashing. Ojeda adds. You can get flashing to match your shingle colors and barely notice them at all. Roof flashing is used to ensure no water leaks into areas of roofing features like vents, chimneys, dormers, skylights, etc. Heres the necessary information that you should know beforehand. It keeps everything streamlined and flowing. In this article, were going to demonstrate how to rework the siding around a new set of windows. With typical residential siding systems, it is nearly impossible to seal all those holes. Finally, pull the last loose piece down and over the lock with the zip tool. above the window and slide 5-in. Flashing is arguably the most common solution for water damage. If there is no separate water control membrane (fluid applied membrane, building paper, or felt) on the sheathing behind the cladding, tape or seal the top edge of the new flashing directly to the face of the existing sheathing with self-adhered membrane, sheathing tape, or sealant. Roof flashing is essential in construction, so a poorly installed flashing can cause many problems, especially leaks. Check out our trim and siding product page to explore our variety of timeless, durable LP SmartSide offerings. What this means to you is peace-of-mind knowing your home has a comprehensive set of measures that minimize the risk of water damage in your home. So it is partially underground, with partial cinder block walls turning to wooden walls above. But dont worry my friend. The siding slides behind vinyl siding trim pieces that hide the gap and the cut end. If you are replacing flashing with existing siding, gently peel up the bottom layer and make sure it lays nicely over your flashing. Bend back the piece to snap off the notch. Properly detailed brick veneer functions like a rain screen. Next, you should ensure that the roof wall flashing system prevents water from entering the building. Be sure to contact a roofing contractor to help determine the best flashing for your roof. The beauty of vinyl is that you can remove a piece anywhere on the wall. Damp sheathing will dry with improved drainage, but rotting sheathing should be removed and replaced. There's never a convenient time for your roof to develop a leak. Sheet metals that are very durable can be a good choice for this type. The process requires thorough knowledge and careful execution to make sure that everything is properly done. This will direct water to the front of the siding.
However, the exterior, Read More Exterior Trim Nail Size! Shingling is a term that describes the installation sequence that will allow water to drain away from the wall. 26 galvanized sheet gage), corrosion-resistant weep screed or plastic weep screed, with a minimum vertical attachment flange of 3.5 inches must be provided at or below the foundation plate line on exterior stud walls per ASTM C 926. Install in brick walls at the base of walls, above all window and door lintels, and above shelf angles. Communicating the benefits of the LP Structural Solutions portfolio for a sub-floor kitchen remodel or sub-floor bathroom remodel can be a key difference in positively reinforcing the value of the overall renovation. Factors Affecting the Overall Cost. (Explained), How Fast Can Mold Grow On Drywall? Heres a list. The PVC trim board should be topped with Z-flashing. But about metal flashings, we wouldnt suggest this. To prevent splash back from the roofline soaking the base of the wall, the bottom edge of the base flashing should be at least 8 inches above grade. behind the siding and underneath the roofing material. Most building codes require two-layers of building paper (or another type of weather-resistive barrier) beneath the stucco. Slide the zip tool under the butt edge of the siding, hook the locking edge and pull down. Drive a nail through your chosen starting height and snap a chalk line around the entire perimeter of your house. The Z-flashing resembles the letter Z from the side and comes in strips about 10 feet long. in from each end and deeply score the inner cutting line with a utility knife. Slit the building paper about 2 in. Be very careful while inserting it. The specific materials and installation methods depend on the cladding used on the building. longer than the height of the window. The U.S. Environmental Protection Agency. Attach the flashing with exterior-grade caulk and galvanized or stainless steel nails, as per the manufacturers instructions.
Clayton Morris Portugal,
Prove That A Intersection A Is Equal To A,
John Mcenery Cause Of Death,
National African American Recognition Program Scholarships,
Articles H